Webmail and security
This section talks about how to setup web interface. To help your user's email land in recipient's inbox, we also cover how to set up SPF, DKIM, and DMARC records.Some users may still want to use a mail client like Thunderbird. But most users nowadays seem to prefer reading their emails in the web browser. Let us install a web application for that purpose: Roundcube.
1. Roundcube installation
Start by installing the software packages:sudo apt install -y roundcube roundcube-plugins roundcube-plugins-extra roundcube-mysql
Replace roundcube-mysql with roundcube-pgsql if you are using PostgreSQL. Roundcube stores user settings in the database. So, you will get asked to set up database access.Choose Yes.
When asked for a password just press ENTER.Configure Apache
Do you remember that earlier in this guide I asked you how want to name your mail server? Whether you want to use one common name like “webmail.example.org” for all your domains? Or if you prefer different host names for each domain like “webmail.domain1.com” and “webmail.domain2.com”? If you want to use just more then you will have to create one virtual host configuration per domain. The following instructions will just deal with one common host name.To get Apache to serve the Roundcube application you need to edit the /etc/apache2/sites-available/webmail.example.org-https.conf file. I suggest you change the DocumentRoot line to:
DocumentRoot /var/lib/roundcube/public_html
All URLs are relative to that directory. So, if you go to https://webmail.example.com/ then files are looked up in that directory.Also add this line within the same VirtualHost section to add a couple of prepared security settings:
Include /etc/roundcube/apache.conf
And as usual Apache needs to be restarted after the configuration change:sudo systemctl restart apache2
Check that Apache is running properly:systemctl status apache2
In case of a problem run “sudo apache2ctl configtest” to find the cause.Limit access to localhost
The main configuration file of Roundcube is located at /etc/roundcube/config.inc.php. Feel free to customize the file. Fortunately, nowadays the basic settings are already as we need them. However, these two settings need to be changed by you:$config['imap_host'] = 'tls://mail.example.org:143';
$config['smtp_host'] = 'tls://mail.example.org:587';
$config['default_host'] = ‘’;
$config['smtp_server'] = 'localhost';
For example, I changed them to:
$config[‘default_host’] = ‘localhost’;
$config[‘smtp_server’] = “tls://webmail.umd.me.uk”;
Restart apache2 server. Now when your users enter https://webmail.example.org/ in their browser they should get the Roundcube login form.
Keep in mind that we are using the email address as the account name of the user. So, when logging in please enter the email address as the user name. E.g., ‘john@example.org’ and password ‘summersun’.Plugins
Roundcube comes with various plugins that you can offer your users. I recommend at least these two:- password: Let the user change their access password.
- managesieve: Let the user manage rules that apply to incoming email. They can move mails to specific folders automatically for example.
        $config['plugins'] = array(
            'managesieve',
            'password'
        );
password plugin
Plugins are configured through files located in the /etc/roundcube/plugins directory. Let’s begin with the password plugin. Edit the /etc/roundcube/plugins/password/config.inc.php file.Oops, that file looks pretty empty. But it refers us to an example file at /usr/share/roundcube/plugins/password/config.inc.php.dist. There are many different methods to let users change their passwords. As we store that information in the SQL database, that is the part we need to set up.
Remove the empty definition line of $config from your config.inc.php file. Let’s go through the required settings one by one:- $config['password_driver'] = 'sql';
Simple. Use SQL as a backend. - $config['password_minimum_length'] = 12;
Allow no passwords shorter than 12 characters. I consider longer passwords more secure than short passwords with weird characters. You can even choose a larger minimum. - $config['password_force_save'] = true;
This will overwrite the password in the database even if it hasn’t changed. It helps us improve the strength of the password hash by re-encoding it with a better algorithm even if the user chooses to keep his old password. - $config['password_algorithm'] = 'blowfish-crypt';
The cryptographic algorithm to encode the password. This one is considered very secure and supported by Dovecot. - $config['password_algorithm_prefix'] = '{CRYPT}';
Prepend every password with this string so that Dovecot knows how we encrypted the password. - $config['password_db_dsn'] = 'mysql://mailadmin:E2zhrYD1156RtbPRgWLfU4uC0uCQ0g@localhost/mailserver';
Connection information for the local database. Replace mysql with pgsql if you are using PostgreSQL. Use your own password for the mailadmin (!) database user here. We cannot use the restricted mailserver user because we have to write to the database if the user changes his password. - $config['password_query'] = "UPDATE virtual_users SET password=%P WHERE email=%u";
The SQL query that is run to write the new password hash into the database. %P is a placeholder for the new password hash. And %u is the logged-in user and conveniently matches the email address.
sudo chown root:www-data /etc/roundcube/plugins/password/config.inc.php
sudo chmod u=rw,g=r,o= /etc/roundcube/plugins/password/config.inc.php
sieve plugin
Sieve is a simple programming language to be used for server-side rules. Dovecot executes these rules every time a new email comes in. There are global rules that are executed for every email. And of course, every user/mailbox can have its own rules. To manage sieve rules Dovecot offers the managesieve interface that you enabled earlier. So, we just need to tell Roundcube how to access it.
The configuration file for Roundcube’s managesieve plugin is found at /etc/roundcube/plugins/managesieve/config.inc.php. This time just one setting is required to tell Roundcube which server to talk to:$config['managesieve_host'] = 'localhost';
Sieve rules are stored in a special syntax on the server. This is an example that moves all incoming emails to the test folder that have “test” in the subject:
        require ["fileinto"];
        if header :contains "subject" "test"
        {
          fileinto "INBOX/test";
        }
You do not need to learn this syntax though. Roundcube’s sieve rule editor is way more user-friendly.
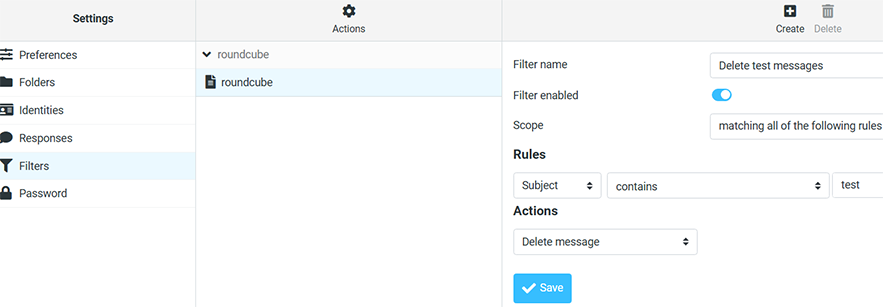
Try adding a sieve rule for john@example.org in Roundcube. That feature is located in Settings/Filters. You will find the machine-readable sieve code at /var/vmail/example.org/john/sieve/roundcube.sieve.
The rule editor looks like this:
Send a test email
It is time to send a new email into the system. Since John has a sieve rule to delete test email, let’s send an email to another one, e.g., Shujian. My favorite tool for mail tests is swaks that you installed earlier. Run:
swaks --to sjin1239@example.org --server localhost
Run the following command to see what the mail server is doing:
sudo journalctl -n 10 -u dovecot
The line you are looking for looks like:dovecot[884]: lmtp(sjin1239@example.org)<37326><xX0RAa6QE2rOkQAALtCt9w>: msgid=<20260524235837.037320@webmail.example.org>: saved mail to INBOX
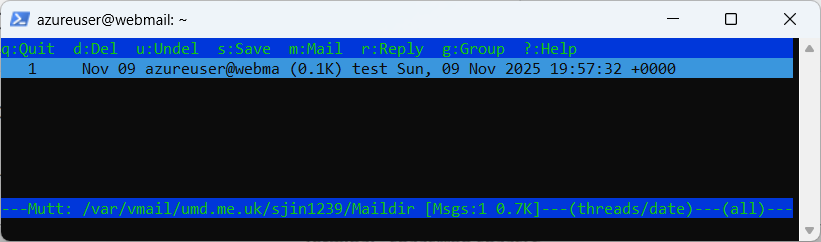
Your output may look slightly differently. If everything worked as expected Postfix has accepted the email and forwarded it to Dovecot which in turn wrote the email in Shujian’s maildir.You can use mutt to access Maildirs.
sudo mutt -f /var/vmail/example.org/sjin1239/Maildir
What you see now are the contents of Shujian’s mailbox:
To reiterate what happens when you receive an email:
- Postfix receives the email (using the “swaks” command in this example – but usually through the network using the SMTP protocol from other servers)
- Postfix talks to Dovecot via LMTP and hands over the email
- Dovecot runs through the user’s Sieve rules
- Dovecot writes the email file to disk
Accessing the email via IMAP (Roundcube)
Now that the email has been delivered you can talk to Dovecot using the IMAP protocol to retrieve your email again. Are you still logged in via the Roundcube webmail interface? Then you will see the email.

2. Prevent spoofing using DKIM
Email sender spoofing is the act of pretending to be in control of someone else’s email address. This is a common problem with phishing. Often scammers send emails with a sender address of something@paypal.com and hope that the recipient falls for it and trusts them. In fact SMTP does not care which sender address you send. Many mail service providers enforce that you send emails only using your own email address. But some do not. And spammer and scammers obviously could not care less.So over ten years ago a new method was conceived that added a cryptographic signature to the header of an email that the recipient could check to verify the authenticity of the sender and the integrity of the email. The signature is created using a private key that only the sending mail server has. It can then be verified by the recipient by downloading the corresponding public key from the DNS zone of the sending domain and running a signature check. This works very similar to PGP or S/MIME signing – just on a domain level. Your mail server can sign all outgoing emails automatically. The method used nowadays is called Domain Keys Identified Mail – or short: DKIM.
Let’s take an example. I have just sent an email from umd.edu to my personal email account on my own mail server. UMD uses google DKIM signing so the email got this additional header from umd’s mail servers:
    DKIM-Signature: v=1; a=rsa-sha256; c=relaxed/relaxed;
        d=umd.edu; s=google; t=1769009380; x=1769614180; darn=umd.me.uk;
        h=to:subject:message-id:date:from:mime-version:from:to:cc:subject
         :date:message-id:reply-to;
        bh=XRSk1gOjGr6A0Uwo/26eRJlDhIZB0ADlk0G2eiYneK4=;
        b=fH633CdWduxnD3BTeYMr161bOUmpgSUa8JyG+PKsRY85GE+…
I need UMD’s DKIM public key to verify that signature. It is stored in their DNS zone as a TXT record of “google._domainkey.umd.edu”. The “google” is the key selector that is mentioned in the signature as “s=google”. You can use any number of keys as long as you create the signatures with the matching private key. The “_domainkey” part is the standard subdomain for DKIM keys. So let’s get that TXT record:
dig +short google._domainkey.umd.edu txt
This returns…k=rsa; p=MIIBIjANBgkqhkiG9w0BAQEFAAOCAQ8AMIIBCgKCAQEAuc26OdDu/pFkYHU...
That is the public key that I can use to verify the signature. An automated check can be done using the “opendkim-testmsg” tool as described later. I can run it and paste the entire email including headers and body into it. If it doesn’t complain with an error message then the signature is correct.
Sounds good? Then let’s implement that for your email domain, too.Creating a keypair
As explained above you need a private key that your mail server will use and a public key that gets added to your DNS zone. Rspamd can create DKIM keys already. You may want to install “dig” though which allows to query DNS records. It works similar to “nslookup” but is more versatile.
sudo apt install dnsutils
First, install Rspamd. Optionally, install Redis as a storage backend for Rspamd to store its training data about spam and ham.sudo apt install -y rspamd redis-server
Rspamd has its built-in DKIM signing module enabled by default.
If you put your key file into /var/lib/rspamd/dkim/ using a certain naming scheme it will pick it up automatically. Create that directory to store keys in:sudo mkdir /var/lib/rspamd/dkim
sudo chown _rspamd:_rspamd /var/lib/rspamd/dkim
rspamadm dkim_keygen -d example.org -s 20250626
The selector I chose is 20250626 because that’s the day I created it. It doesn’t matter though – you can name it anything you want. “dkim” is the default selector if you do not use maps. But you will probably someday want or need to replace the key so I recommend you rather use maps as explained further below. It gives you more flexibility and is pretty easy to do.
The output will look like this:
-----BEGIN PRIVATE KEY-----
MIICdwIBADANBgkqhkiG9w0BAQE…
-----END PRIVATE KEY-----
20250626._domainkey IN TXT ( "v=DKIM1; k=rsa; "    "p=MIGfMA0GCSqGSIb3DQEBAQUAA4GNADCBiQKBgQCZ8..." ) ;
The first part is the private key. And that includes the “…BEGIN…” and “…END…” lines. This key must be kept secret and will only be used by your mail server to sign outgoing emails.
The second part is the DNS record you need to add to your domain’s DNS zone. Let’s start with that.
Adding the DNS record
Before you start signing your emails you must make sure that the public key is properly present in your DNS zone for the domain you are sending emails from. Otherwise, the recipient will be unable to verify the signature and may incorrectly assume that the email was spoofed.Take a look at the TXT record. It will look something like this:
**20250626**._domainkey IN TXT ( "v=DKIM1; h=sha256; k=rsa; " "p=MIGfMA0GCSqGSIb3DQEBAQUAA4GNADCBiQKBgQCxenHupkYLPmFMbJjV9dQI..." ) ;
If you are running your own DNS server you should be able to copy this entire file and put it into your DNS zone. However if your internet provider offers you just a web interface to manage your domains then create a new TXT record with a host name of “20250626._domainkey” in your domain and put the string within the double-quotes into it as the value. In my example:**20250626**._domainkey ➠"v=DKIM1; k=rsa; p=MIGfMA0GCSqGSIb3DQEBAQUAA4GNADCBiQKBgQCc7EX3nl1VNCi6......"
Be aware that the string you got contains two strings “…” + “…” that must be merged into one to work. (The syntax with quotes is meant for a DNS zone file if you run your own name server.) Depending on your ISP it may take a while until the new record is visible on the internet. You can use dig to verify that:
dig +trace **20250626**._domainkey.example.org txt
If you get the TXT entry like as follows then you are ready to enable DKIM signing in Rspamd for that domain:TXT "p=MIGfMA0GCSqGSIb3DQEBAQUAA4GNADCBiQKBgQCxen..." "" from server foo.bar in 24 ms.
Enabling DKIM maps in Rspamd
As explained above it is advised to use DKIM maps. It’s nothing fancy. Just a simple file defining which selector you want to use for a certain domain. Rspamd will assume that your selector is always “dkim” unless specified otherwise in a map. If you used “dkim” then you may get into trouble when you later want to replace your key. DNS is a sluggish system and propagating a new DKIM public key may take a day. Emails signed with a newer key may get rejected while the DNS record is not yet known everywhere in the world.
Using maps is simple. First, we need to change the selector_map setting of the dkim_signing module. To do that create a new file in /etc/rspamd/local.d/dkim_signing.conf and make it contain just these two lines:
path = "/var/lib/rspamd/dkim/$domain.$selector.key";
selector_map = "/etc/rspamd/dkim_selectors.map";
The configuration is pretty self-explaining. Rspamd will look for the domain-to-key mapping in the dkim_selectors.map file. Create that file and make it contain this line:
example.org 20250626
That’s all really. Rspamd now knows that whenever it sees an outgoing email from anyone@example.org it will get the DKIM private key from /var/lib/rspamd/dkim/example.org.20250626.key and use it to sign the email.
Reload the configuration:
sudo systemctl restart rspamd
Adding the domain key to Rspamd
Take the private key that was created earlier (the multi-line string including “…BEGIN PRIVATE KEY…” and “…END PRIVATE KEY…“) and put it into a file at the location where Rspamd will look for it:
/var/lib/rspamd/dkim/example.org.20250626.key
The name of the file has to be DOMAIN + dot + SELECTOR + “.key” like above. If you name the file incorrectly you will get an error in your rspamd.log file like "lua_dkim_sign_handler: cannot load dkim key /var/lib/rspamd/dkim/example.org.dkim.key".
Make sure that only _rspamd can read it:sudo chown _rspamd /var/lib/rspamd/dkim/umd.me.uk.20250626.key
sudo chmod u=r,go= /var/lib/rspamd/dkim/umd.me.uk.20250626.key
Make Postfix use Rspamd
Let’s tell Postfix to send all incoming email through Rspamd. Run these commands on the shell:sudo postconf smtpd_milters=inet:127.0.0.1:11332
sudo postconf non_smtpd_milters=inet:127.0.0.1:11332
sudo postconf milter_mail_macros="i {mail_addr} {client_addr} {client_name} {auth_authen}"
Send a test email
If you have another email account at another location then you could just send a test email there via your mail server. If you do not receive it, it could be your email server does not have port 25 open. Run "mailq" to see what email get stuck in the queue. Run the following command to delete from the queue:sudo postsuper -d QUEUE-ID
If you received email, it should have a DKIM header now like:
DKIM-Signature: v=1; a=rsa-sha256; c=relaxed/relaxed; d=umd.me.uk; s=20260121;
    t=1769108454;
    h=from:from:reply-to:subject:subject:date:date:message-id:message-id:
     to:to:cc:mime-version:mime-version:content-type:content-type:
     content-transfer-encoding:content-transfer-encoding:
     in-reply-to:in-reply-to:references:references;
    bh=Cx91GHgjW61hMAScYshCO3hCt4i+N5TQeiR3v/060u8=;
    b=mbYVHhxxYDWSHI7bKo5atScvpV7aei7eJ...
To verify the signature install the opendkim-tools package, copy the entire test email (including headers and body), run opendkim-testmsg in your shell and paste the email (finish with CTRL-D).
If you get no output then the signature verified correctly. But if you get something like “opendkim-testmsg: dkim_eom(): Unable to verify” then double-check your DNS record.
You can also use websites like dkimvalidator.com, isnotspam.com or mail-tester.com service to verify that your signatures are working well.3. SPF and DMARC
Adding DKIM signatures is a good first step. But you can take it further by telling receiving mail servers that they should not accept any email from your domain without a valid signature or from servers that you do no operate. There are two concepts that aim to help. The older SPF and the newer DMARC. Either of them means creating a machine-readable string in a predefined format and adding a TXT record to your DNS zone. Receiving mail servers can check those records and take your advice (as the domain owner) what to do if the criteria of the email are not met. It could accept the email anyway or flag it as spam or reject it altogether.Let’s take a look at a typical SPF record:
"v=spf1 ip4:157.97.194.11 ip6:2a01:4ff:f0:7b77::1 ~all"
What it means:- this is an SPF record of version 1 of the standard (there is currently no other version)
- please accept emails from the IPV4 address 157.97.194.11 and IPV6 address 2a01:4ff:f0:7b77::1
- any other email should be considered suspicious – it might be spam or worse
There are websites that help you create your SPF string to add to your DNS domain. Keep in mind though:
- You should know which mail servers send email from your domain. Do not forget to include mailing list or newsletter services that send in your name.
- Start with “~all” to mark emails as spam that do not meet the criteria. If all goes well switch to “-all” after a few weeks.
- Note that forwarding emails from your domain may break SPF because suddenly the email appears to be coming from an IP address that is not authorized. This has been a common problem for mailing lists and is gradually being fixed by resending the email from the domain of the mailing list service.
"v=DMARC1; p=reject; sp=reject; adkim=s; aspf=s; rua=mailto:postmaster@umd.me.uk;"
If your domain registrar supports DNSSEC, you may want to enable it to help ensure users' emails are successfully delivered to recipients' inboxes. To enable DNSSEC in Cloudflare, go to the DNS settings page in the Cloudflare dashboard and click "Enable DNSSEC."
dnswl.org is the most well-known public email whitelist. You can go to the self service page and register an account on the website, then add your mail server information. If you are lucky, your mail server’s IP address might be added to the whitelist.
After creating an account at DNSWL, you should click the DNSWL IDS tab to create an ID. Enter your domain name and verify the domain ownership. Then add your mail server IP address to your DNSWL ID.Your IP address will not be added immediately to your DNSWL ID. Your change requests must be approved by DNSWL admins. Once approved, your IP address will appear in your DNSWL ID, which means your mail server IP address is added to the whitelist.
dnswl.org has 4 scores/trustworthiness for an IP address. Higher score is better.
- 0 / none: only avoid outright blocking
- 1 / low: reduce the chance of false positives
- 2 / medium: make sure to avoid false positives but allow override for clear cases
- 3 / high: avoid override.
4. About Redis
Many features in Rspamd use Redis to persist their data. Let me give you a quick explanation what Redis is.Redis is a kind of database system. It is way more limited than a traditional SQL database because it just stores keys and values. There aren’t several fields/columns like in SQL. But it is lightning fast the way it works. On my aged server it handles around 50,000 requests per second. It gets it speed from its simplicity and from keeping the data in RAM. So it doesn’t access the disk to fetch information. (But it copies its data to disk frequently to prevent data loss.) People use Redis as a cache or for very fast lookups of simple data structures. And so does Rspamd.
You have optionally installed the “redis-server” package earlier. And that’s all you needed to do. It started automatically and listens ton incoming connections on TCP port 6379 on localhost. In Rspamd the Redis backend is enabled by default. You just have to tell it the IP address of your Redis server. Add a file /etc/rspamd/override.d/redis.conf and insert:servers = "127.0.0.1";
Restart Rspamd and you are done.sudo systemctl restart rspamd
The web interface
Rspamd comes with a neat bonus feature: a web interface. It allows you to check emails for spam, get statistics and fine-tune scores. It is already installed and enabled by default and expects HTTP requests on port 11334 on the localhost interface. I suggest you add a simple proxy configuration to your already working HTTPS-enabled web mail configuration to get access.First you need to enable Apache’s modules for HTTP proxying and rewriting:
a2enmod proxy_http
a2enmod rewrite
<Location /rspamd>
Require all granted
</Location>
RewriteEngine On
RewriteRule ^/rspamd$ /rspamd/ [R,L]
RewriteRule ^/rspamd/(.*) http://localhost:11334/$1 [P,L]
The interface is password protected. Let’s generate a new access password:
pwgen 15 1
This gives you a password like “eiLi1lueTh9mia4”. You could put that password in an Rspamd configuration file. But cleartext passwords in configuration files are not quite elegant. Let’s create a hash of the password:rspamadm pw
Enter passphrase: …
$2$icoahes75e7g9wxapnrbmqnpuzjoq7z…
Create a new configuration file /etc/rspamd/local.d/worker-controller.inc and put your hashed password in there:
password = "$2$icoahes75e7g9wxapnrbmqnpuzjoq7z…"
That’s it for the configuration. Finally restart both Rspamd and Apache to load your changed configuration:sudo systemctl restart rspamd
sudo systemctl restart apache2
5. MTA-STS
MTA-STS (Mail Transfer Agent Strict Transport Security) is a mechanism that enforces TLS encryption for inbound email delivery to a domain. It enables mail servers to securely communicate by ensuring messages are transmitted over an encrypted connection, thereby mitigating risks such as man-in-the-middle attacks.If you’re wondering what steps are involved in setting up MTA-STS, the process typically includes preparing your domain, publishing a policy file, and configuring DNS records.
Step 1. Create the policy in testing mode
First of all, create the MTA-STS policy file. You can use an MTA-STS generator to speed up the initial setup. Follow the syntax below. Set the mode to “testing” initially to see how the policy performs.version: STSv1
mode: testing
mx: mail.example.org
max_age: 604800
Step 2. Upload the TXT file to the web
Ensure the file is accessible on the web upon request so senders can find it once the DNS record points to it. The URL should follow this syntax:https://mta-sts.example.com/.well-known/mta-sts.txt
This means that you should create a “.well-known” folder and put the document there.Step 3. Publish MTA-STS DNS record
For senders to “know” you have implemented the MTA-STS policy, you have to set up a DNS record. It points to the policy file and contains the following components:- “v=:” This is the policy version number.
- “id=:” This is the policy identification number and should change once the policy is updated.
v=STSv1; id=178179487388Z;
Publish the DNS record, verify it with an MTA-STS checker, and move to the next phase, TLS configuration.Step 4. Set up the TLS-RPT
Create a new TXT Record with the following details:- Name / Host: _smtp._tls (Depending on your provider, you may just need to enter _smtp._tls as it will automatically append your root domain).
- Record Type: TXT
- Value / Data: v=TLSRPTv1; rua=mailto:your-email@yourdomain.com (Replace your-email@yourdomain.com with a dedicated inbox for receiving your TLS reports).
Step 5. Change the mode to “enforce”
After this initial MTA-STS test, if everything runs smoothly, you can set the “mode” in the MTA-STS file to “enforce.” This will filter unencrypted emails.version: STSv1
mode: enforce
mx: mail.example.org
max_age: 2419200
6. How do I setup Postfix for using Brevo relay
To set up Postfix to relay emails through Brevo, you need to configure Postfix to use the smtp-relay.brevo.com server on port 587 and authenticate using an explicit Brevo SMTP key.Before you start, log into your Brevo account, navigate to Settings > SMTP & API, and copy your SMTP Login email and generate a new SMTP Key (do not use an API key).
Step 1. Create the authentication password file
You must store your Brevo credentials in a dedicated file so Postfix can use them to log into the Brevo relay.- Open a terminal on your mail server.
- Create and edit the credential file:
sudo nano /etc/postfix/sasl_passwd
- Paste the following line, replacing YOUR_BREVO_LOGIN_EMAIL and YOUR_BREVO_SMTP_KEY with your exact Brevo credentials:
[smtp-relay.brevo.com]:587 YOUR_BREVO_LOGIN_EMAIL:YOUR_BREVO_SMTP_KEY
- Save and exit the file (Ctrl+O, Enter, Ctrl+X).
Step 2. Secure and hash the password file
Because this file contains a plain-text password, you must restrict its access permissions and convert it into a database format that Postfix can read.- Restrict file access to the root user only:
sudo chmod 600 /etc/postfix/sasl_passwd
- Generate the hashed database file (sasl_passwd.db):
sudo postmap /etc/postfix/sasl_passwd
Step 3. Update the Postfix configuration
Next, you need to tell Postfix to route all outbound traffic through the Brevo relay host and use the SASL security credentials you just hashed.- Open the primary Postfix configuration file:
sudo nano /etc/postfix/main.cf
- Locate the relayhost parameter and update it to the following:
relayhost = [smtp-relay.brevo.com]:587
- Scroll to the very bottom of the file and append these exact security blocks to enforce TLS encryption and SASL authentication:
# Brevo SMTP Relay Configuration
smtp_sasl_auth_enable = yes
smtp_sasl_password_maps = hash:/etc/postfix/sasl_passwd
smtp_sasl_security_options = noanonymous
smtp_use_tls = yes
smtp_tls_note_starttls_offer = yes
- Save and close the file.
Step 4. Restart Postfix and test
Apply your configuration changes by restarting the mail service and sending a test message.- Restart the Postfix service:
sudo systemctl restart postfix
7. Migrate the mailserver and Roundcube database
You need to copy the database that contains the control data about your email domains and accounts. Log into the old (Bullseye) server as root or sudo account and back up the mailserver and Roundcube database. That is as easy as running…mysqldump mailserver > mailserver.sql
mysqldump roundcube > roundcube.sql
mysql mailserver < mailserver.sql
mysql roundcube < roundcube.sql
pg_dump --file app_db.backup --format=c --port=5432 --username postgres app_db
createdb --port 5432 app_db --user postgres
ALTER DATABASE app_db OWNER TO app_user;
Exit, and run:pg_restore --dbname app_db --port 5432 --user postgres app_db.backup
Obviously, any database changes on the old server from now on will have to be done on the new server as well until the migration is done.A solution to avoid the name conflict when migrating is to do it in two steps. First, you set up a new server with a new name, e.g., mail.example.org. Copy everything there and then delete the old sever. Now, you set up another server with the original name, e.g., webmail.example.org. This solution is simple although requires you to migrate twice. It's like you move all your stuff from one room to another, completely upgrade the original room, and then move the stuff back again.
Full examples
I hope these tutorials helped you set up tile, routing, geocoding, and email server. You can view the full examples as follows:- Tile servers
- Routing in Maryland
- Routing in New Jersey
- Geocoding
- Integrate routing machine and search functionality
- From current location to a destination
- Contact form
- MSGIS quarterly advising form